Building a budgeting service
A post-hoc analysis, part 1
So, it’s been over a year since I “took a break” from working on my stealth startup project, and I guess it’s safe to say that I’m not going to pick it up again. Around 3 years ago, inspired by the success of the personal budgeting service mint.com in the US, and wanting something similar myself, I started investigating possibilities for making a personal budgeting service for the norwegian market. I ended up working on the project in my spare time for over a year.
In this post I’ll go through the challenges I encountered, some of the solutions, and in a later post I’ll go through the reasons I stopped working on it, and some lessons learned.
In short, I decided to prototype a web service for personal budgeting, i.e. setting up an overview of how much money you spend each month, how you spend it, tips for spending less, as well as other useful information. The budget was supposed to be set up automatically (as mint.com did) based on transaction information from users’ bankaccount statements. In order to do this, my web service had to pull the transaction information from the banking websites, categorize the transactions (in order to find out how money was spent), and finally present the aggregated information in a sensible way to the user.
It was not obvious that this would be possible at all when I started investigating it, since dealing with norwegian banks have some specific challenges that I’ll get to below. I anyway started mocking up a prototype around the spring of 2010, and ended up working on it until the fall of 2011.
The prototype
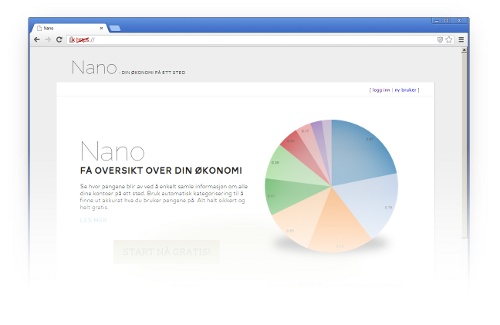
The working title was, pretty arbitrarily, “Nano”, and this is what the final prototype looked like (click image for slideshow):
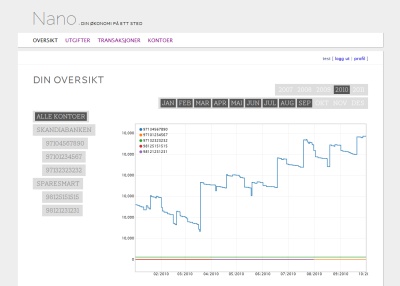
The resulting web service was actually able to pull down transaction information from an users’ bankaccount (after the user had provided login information), categorize the transactions, and present a very simple overview of trends and expenses. It was neither polished nor perfect, but it managed to do what it was supposed to.
The main challenges in building the web service was getting the transaction details from the banks and managing to categorize the transactions based on the relatively limited information we got. I’ll go through how I solved these here.
Getting the transactions
From what I could gather, the way mint.com (or rather, Yodlee) collected information from the bank accounts of users was by a mixture of existing financial APIs, and simply scraping the users’ bank account using login username and password that the user shared with mint. It was, unfortunately, not straightforward to do the same in Norway.
Norwegian banks have no APIs to access bank account information, at least not with details such as historical transactions. Most banks allow you to download your account information in excel format when you’re logged in, but there is no API to do so for third parties, and getting users to download and upload the excel sheets to the web service manually was not really an option.
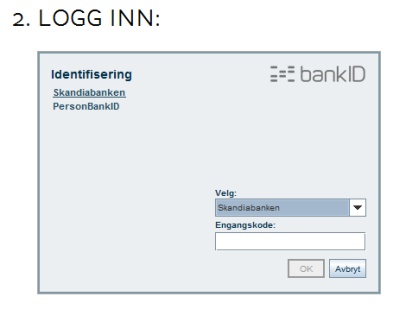
As for scraping the websites, unlike the web banking solutions in the US, where username and password is sufficient to get complete access to a users’ bank account details, scandinavian banks all have two-factor authentication (called BankID). Two-factor authentication usually means that in addition to a password, you also need input from something the user has, usually a code-chip or a challenge/response code-card. This is much more secure, but unfortunately makes logging into banks without having the code-chip or code-card impossible, so just passing the username and password to a remote server and letting it do the scraping would not be possible.
To get around this, the easiest idea I could come up with, was to simply open the bank website in a small iframe inside our web service, expose the bank’s own login mechanism directly to the user, let the user log in, and then use javascript/DOM events to scrape the bankaccount and send the information to our server in the background. This actually worked great for a few months, the only disadvantage being that the user had to wait while the scraper did its work in the background, and could not close the browser window while it was going on.
Unfortunately, as I painfully discovered a few months later, the X-Frame-Options response header had just became a semi-standard and trickled into most browsers around this time. This header enabled site owners to specify whether it was allowed to “frame” their website inside another page. Not surprisingly, most banks promptly specified that this should not be allowed, so I had to start from scratch. In hindsight, I’m surprised this was possible at all when I started, as it was a massive opportunity to spoof banking sites and manipulate users into giving away their login information, if used maliciously.
As a quick fix, I tried to use extensions to modify the X-Frame-Options headers and work around the restrictions. Though I managed to do it, it proved to only be possible in Firefox, so I discarded it as an option. Also, getting the user to install an extension as the first step of the web service would probably make for truly horrible conversion rates.
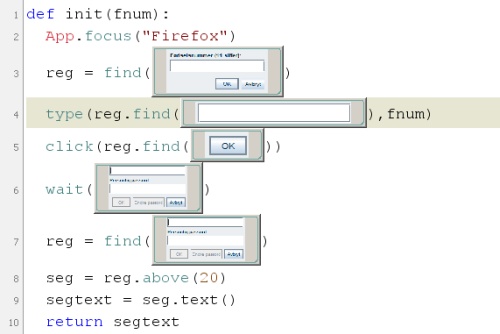
Since I couldn’t do the scraping inside the users’ browser, the only option was then to anyway try to do the scraping remotely. I would still have to expose the login mechanism to the user somehow, though. I originally thought about trying to expose it via remote display (such as VNC), but found that a much more robust solution was to simply mirror the login mechanism instead. This was not trivial, as BankID, the two-factor authentication mechanism used in Norway, is implemented as a Java plugin, which means you can’t use regular DOM APIs for interacting with it. As such, any automated login couldn’t be done with regular javascript web automation tools (such as Selenium). Instead, I ended up using Sikuli, which is an automation tool based on OCR and image recognition. This worked surprisingly well, the result was that the login information would be passed to the remote server, and any type of BankID challenge could be channeled back to the user and responded to in a timely manner. After the login was done, the scraping could continue remotely.
In the end I had a mechanism that was relatively painless for the user. On first using the web service, and whenever the user wanted to update with most recent transaction information, the user would log in to their bank via an interface that was similar to BankID, and the remote server would then take over and scrape all details. After scraping was done on the server, the transaction information was passed back to the webserver, where it would be categorized and exposed to the user.
The main drawback was that there was no way to update the transaction information at a later stage without the user logging in to the bank again. Mint.com’s mobile app enabled you to view your always updated account information and budget while on the go, but this would not be possible here. I speculated that it might have been possible to never log out of the bank on the remote server, keep the browsing session open forever, and then just scrape whenever we needed it, but this sounded a bit too fragile, and banks would probably have put an end to it as soon as they discovered it. As I started work on the web service, there was some testing of BankID on mobile, which might have been feasible to use for a mobile app, but given that it was (and still is) only available to some banks and phone operators, I never tested it out.
Classification
Once I’d managed to scrape the transaction details from the users’ bank accounts, we needed to classify the transactions, which was by far the most interesting part of the work. Most transactions looked like this: the transaction amount, the type of transaction (visa, sales, giro or otherwise) and a character string (the “vendor id”) which served to identify the vendor where the transaction was done. The challenge was then to use these details to classify the transaction as specific expenses, such as food, gym, gas, cinema, etc.
From what I could deduce, the format of the vendor ids was supposed to be something like this:

The major portion of transactions were from pretty well known norwegian chains, such as “REMA 1000”, “ICA” & “Clas Ohlson”, which means it was trivial to identify these (and the corresponding category) with a simple lookup. The rest, though, were tricky. When the vendor was not a major chain, we needed to get the address in order to do a yellow pages lookup.
Judging from the format above, we should be able to tokenize the strings and pull out the address very easily. That, however, often proved to be problematic. Here are some examples of vendor ids from transactions:
- 28.01 T BIL ARKITEKT STE OSLO
- 23.01 ICA Supermarked Alexsa OSLO
- 23.02 FLYTOGET1021015 OSLO S 245012
- 08.02 KIWI STORGATEN . .
- 07.02 ORANGE MINI SEN UELANDSGT 61 OSLO
- 26.03 POINT NAT JERNBANE 0161 OSLO
- 15.02 JAVA ULLEVÅLSVEIN OSLO
- 17.09 OLYMPEN, MOB 1 GRNLANDSL 15 0194 OSLO
- 01.02 RØTTERNATURPROD ULLEVÅLSVN.3 OSLO
- 23.02 CG 0130 KJØKKEN KJØKKENAVD UETG
- 22.06 Kløfta Øst Bili stsente KLØFTA
- 16.11 SHELL AS AS
- 15.05 ST.HANSHAUGEN ULLEVÅLSVN. OSLO
Since each field had character limits, a lot of long street names or company names were abruptly cut short or creatively shortened (such as grnlandsl to mean grønlandsleiret). Company names and adresses could be concatenated. Street numbers and zip codes might or might not be present in almost any field. Some just wrote the address, not the vendor name. Some didn’t write the address. Some vendor ids were so misspelled that I can only assume the vendor was under the influence while punching it in.
Misspellings were relatively easy to solve with edit-distance, but in order to figure out what was feasible edits, we needed to look up all known possible addresses, placenames and zip-codes, which fortunately was provided for free in a downloadable database-format by Posten. With a liberal amount of lookups in this database, we very often could figure out the most likely tokenization and corresponding address and vendor. There was quite a lot of manual tuning involved to make it work optimally, though.
What I didn’t have access to, was how probable each address or place was, which might have helped a lot for ambiguous addresses. Going forward, I could probably have used some sort of public register to calculate population density for each address/region and learned how probable each feasible address was this way.
Anyhow, once I had the top 10 most likely address and vendor names, I could easily do a lookup in yellow pages and see there what type of business the vendor was registered under, making it easy to classify.
All around I managed to get to around 85% classification error with this method, on a limited set of transactions (my own, plus transactions from some friends). In a real transaction list most transactions were usually from major chains (REMA 1000, Kiwi, ICA, etc), so classification would probably be correct somewhere around 90-95% of the time. The rest we would have to ask the user to categorize.
Using external lookup web services, such as yellow pages, would probably not have been feasible on scale, since some of them I’d have to pay quite a bit for. Categorization would also have taken way too long time this way. Going further, I probably would have started out seeding the database with user data and input from external services and used this as training input to a machine learning classifier, which could then be used to try to categorize the vendors based on address and name. If we had very low confidence in some classification, we could resort to more complex processing involving yellow pages as last resort. In a real system, we would also learn from input from users, which would help greatly in categorizing ambiguous vendor ids.
In my next post, I go through some of the reasons I stopped working on the prototype.
If you liked this article, you should follow me on twitter.